Wednesday, June 30, 2010

Patiently Waiting


Day Two of the floor installation. I am just trying to find something to occupy myself while I wait. First thing is a garden walk, and a heavy dew made it seem unnecessary to water. Nice for me. I picked off about five tomato hornworms, and thought: This is the Summer of Insects.  I am thankful for no mosquitos.

This huge green Brandywine tomato was about to pull down the whole plant, so I picked it and added it to the chorus line of veggies on my counter, all but the green pepper are from the garden plot. I like the way the colors swing from yellow to green. I am dying to play with color in my studio. No kidding.

It's cool in my finished bedroom so I set up some challenges with knitting. I have to get out of my mindless knitting rut and try something new. This is a module I used years ago and forgot how to do, so a refresher swatch is in order. The book is Dazzling Knits by Patricia Werner, and is all about modular knits, aka Patchwork Knitting.
I am reminded that one cannot listen to the radio and follow a complicated pattern at the same time. Third try, minus the radio, gave the proper result.
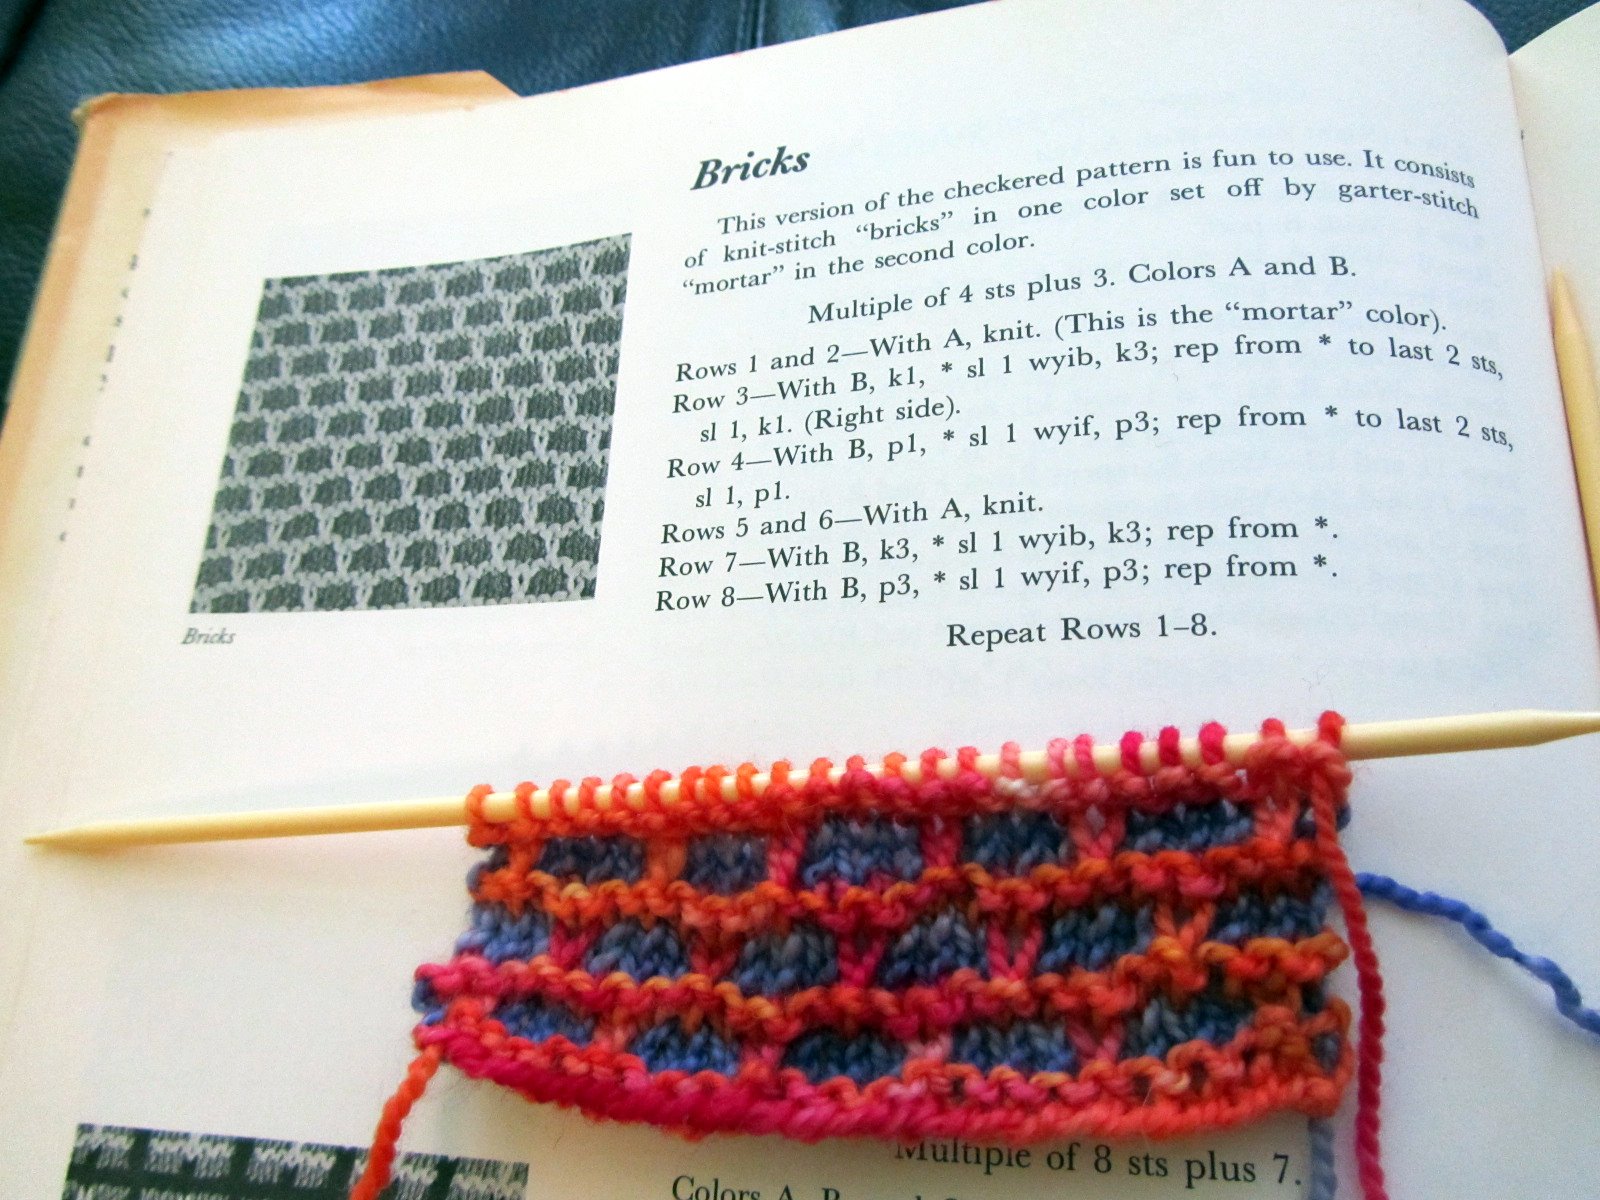
  Next, a pattern I wanted to try in Barbara Walker's Treasury of Knitting Patterns, a book I have had since I learned how to knit at 15. Great volume, and one I have referenced for all these many many years. Where does the time go?
At the end of the day the floor is this close to being done. Just the edges need to be fitted. I will be going to town for knitting today and as usual a stop at Home Depot is in the cards. I will bring home the quarter round trim and finishing nails to complete this project. And then I can move back in and get to work. Hurray!!!
 A very Pushy Phlox.

Tuesday, June 29, 2010

I'm Floored!

  The before picture. Gray-slate-bluish carpet. O did I mention stained? Yes that too. Out with it!
The base was OSB and quite ready for the tile.
The brighter, cleaner, nicer by far floor. All that we have left to do here is add the quarter round at the base of the trim. I couldn't wait to move back in.
Meanwhile, everything has been pulled out of the studio and onto the deck.
 The studio carpet was ripped up, and the concrete imperfections were filled with leveler, and painted with a sealer. The tile in this room is 1/4th done and will be finished today. Same tile here too. I know this improvement will make the biggest difference in the light in this room. And when I drip, or drop scraps, I can clean them up fast and easy. I am not one who likes a hide-the-dirt surface. If I can see it, I can clean it.


I am writing from this corner, facing the windows, my quilt and the doors. Good Feng Shui.

Sunday, June 27, 2010

A Meeting of the Secret Beefeaters Society
Sunday 6:30am:  I called my sister (it was 7:30 her time) and asked her if she wanted to play church hookey and come for a visit. My husband would be away playing baseball all day and her husband was going kayaking. My niece wanted to join us and since she recently dislodged her boyfriend, we had a full cast.
My niece is played by Dakota Fanning with darker hair.
My sister is played by Marcia Gay Harden, and why not?


And the part of me is played by Nia Vardalos...with darker hair. 


Scene 1:
My sister comes for a visit and my first act is to cook a pound of bacon. Or Meat Candy, as she calls it. I don't like the rigamarole of frying bacon (too messy) or microwaving it, or hauling out the George Forman and grilling it. It's the wash up I don't like.  I use a cookie sheet covered with parchment paper. The bacon is lined up and baked at 350 for however long it takes to get crispy. When it is finished, I take the bacon off the sheet and toss out the parchment paper, leaving the cookie sheet immaculate. No evidence remains.
 And since the oven would be on, I might as well make banana bread from those blackening bananas I have staring at me.

Scene2:
 My sister arrives and declares we need to go shopping for shoes.
Wink, wink. Nudge, nudge.
 At the store she suggests getting some beef to grind for hamburgers. Hammmmburgerrrrrs.
Scene shifts to the meat department where we pick up two large chuck roasts. Perfect.
Our husbands cannot eat beef.
The reasons why are unimportant. We girls are beef deprived.

We cannot buy ground beef. WE must grind our own.

I protest the wash up part and my sister promises to do it for me.
OK I succumb. 
 It is sooooo much better to have freshly ground you-know-what-you-are-getting beef.

We have bacon, avocados, onion rolls, fresh tomatoes, sliced cheese and a gas grill. Everything we need to indulge our desires. My niece is 15 and recently discovered beef. She may be a slip of a girl but with her appetite, she won't be for long.
We grill the beef, stack our buns and take a bite. No words are uttered, only grunts of delight.
Fade to black.

Saturday, June 26, 2010

Late June Garden

Friday, June 25, 2010

Process Pledge: Acid Dyes and Silk

I usually dye my silk fabrics with procion mx dyes, just like I dye my cottons. While these dyes are quite effective, there are a few colors I just cannot get. All of the unobtainables are DARK. No black, dark forest green, navy, or really dark blues or purples.
I can apply these dark colors to the silk and they just come out medium, or worse yet, bright!

So it came down to trying a different route, when a favored old customer needed dark dark silks. I decided to use acid dyes.
Here is my collection. Some are Jacquard, some are Pro Chem and some are from Dharma. All are ancient. In this case age doesn't matter. They are all in powdered form and inert. I also have some Easter Egg dyes which come in pellets, and some food coloring and Kool Aid. They all work the same way. The fiber must be protein, like wool or silk for example and the agent or catalyst is plain old white household vinegar.

If you look at my tutorial on dyeing wool yarn in 30 minutes or less, you will see that I am going to do something very similar with silk fabric. I have mixed up some black, royal blue, purple, green and blue-red acid dyes.
I use plain water (1/2 cup) and just a speck of dye. When I say speck, I mean a tiny bit on the end of a toothpick. Acid dyes are just so strong that I have a lifetime supply considering how much I use per piece of fabric. I can always add a bit more dye to get a more intense color, so I stick with tiny bits until I am happy with the resulting solution.
The silk fabric is a half yard length, and it is presoaked in vinegar and water, about 50/50. Then it is wrung out, pleated into a long column and placed on a long sheet of plastic wrap, on my kitchen counter.  With a plastic spoon I ladle on the dyes, one color at a time and press the dyes into the fabric, just as I would with the yarn. When the fabric is completely saturated with dyes, the plastic wrap is folded over the fabric, and enclosed like a package and placed in a microwave safe container (gladware, in this case) and microwaved for 1 minute.
After a minute I check to see if the package has ballooned up from steam, and if not, another minute in the microwave and it will be.
I am careful to let it cool before opening the package, as the contents are boiling hot. Because the silk was folded or pleated there is a small amount of tie-dye patterning, but because the colors are so dark, it is negligible. The resulting wash out yielded the really dark saturated color I was trying to achieve.


Thursday, June 24, 2010

....With a Little Help from my Friends

The lovely and talented Anonymous suggested that I try Borax to deflea my house. Cheap and effective and no bombing required. So I thought Why not?
I found it in the laundry detergent aisle and came right home and began sprinkling it everywhere.
Here it is on my living room floor. I let it sit a while and then swept up a small area and watched the fleas choke, kick, and cry for Momma. I could see them easily on the white powder. It was so satisfying. Everything got dusted, and then I went outside and counted goldfish while I waited for total annihilation to take place.


++++++++++++++++
 

At Knitting yesterday I mentioned to the gals that I was looking for a tile store where I could find lots of choices of tile for my studio and bedroom. They had wonderful suggestions, and I made a list. The first place, and the closest, was Home Depot, and voila, the tile I wanted was right there. Not a very exciting looking tile is it? But it is just what I need.
We have five different floor coverings and none of them match each other, so I was looking for something that would provide a subtle segue between them without calling attention to itself. (So unlike me.) It must be lighter however, and shiny, and not beveled, and not really beige. This is the sample tile and it is lighter than the adjacent bathroom sheet goods, but will work, especially in the studio where there will be lots of it. I needed to get 540 square feet and Home Depot ordered it all of one dye lot and I can pick it up next week when I go to Knitting. Of course I got a good sale price.
++++++
And then here is a reader question, which goes along with my Process Pledge (see sidebar)

Hi Melody,
Would you please discuss your design decisions some? For instance, I think it's so effective that you've sort of dissected this flower and put overlapping parts here and there. How do you arrive at those decisions?

My answer: O dear. The whole thing is sort of a doodle that leads to another doodle and then a doodle refinement.
As I recall, an invitation arrived to participate in a show and the theme was Floral. Having no ideas in my head, I began to lightly sketch big loose overlapping circles. I just let myself make smooth curving lines and soon there were suggestions of daisy-like shapes. Following that lead, leaf shapes became evident. Then using an old standby design idea, I dissected the leaf shape as I had done many times before.

I think the underlying question is asking for my thinking and truly there was none. I don't have a plan, mostly. The design may or may not show up in the sketch, but usually it does. It is definitely necessary to draw, and often, and keep the drawings in one place where they can be found. Sometimes I draw and don't make the quilt for years.


And, for your wonderful tulip pieces, the sliced petals are wonderful, as well as the tiny pieces in the background. I'd love to gain insight on how you arrived at these choices.
My answer: Once again, the design for the tulips was a drawing of overlapping oval shapes. I made the drawing years before the quilt, and was afraid to go forward with it because my friend Frieda Anderson said that the tulips looked like the man eating flowers from Little Shop of Horrors, or clamshells, not tulips.
But eventually I decided to try for the tulip-y look. I had been teaching in Birmingham, Alabama and the airport had some wonderful paintings which had patterns of curving stripes and wiggly and zigzaggy lines and just a ton of great shapes and colors. I took pictures, thinking I could do something like that in fabric.
After I made the tulip shapes, I added the background, extending the lines from the tulips into the background, dividing up the space.
The quilt was a calculation on my part. I wanted to win one more big prize and then I felt I could quit entering shows (and quit having all that stress). So I had to make something over the top, throwing in all but the kitchen sink. Silk, excessive quilting, excessive patterning, excessive color, it all had to work. And it did. First Place and an immediate sale. The purchaser (now deceased) was going to allow me to enter it in several more shows, but I was satisfied and just so glad to be finished with shows.

I think a lot of artists let their imaginations have priority in their brains. Meaning that they ignore logic and go for the feeling. It takes experience and time to trust yourself and your ideas, but once you do, and they gain acceptance, then it is easier to follow your natural inclinations.

Wednesday, June 23, 2010

Wednesday: Going to Town

Today is knitting, plus a load of other stuff.
1.Water gardens, and check for bugs and caterpillars
2. Pack up knitting, camera, books for resale, package to mail
3. Attend knitting group, talk loud and laugh often
4. Go to Lowe's and Home Depot in search of perfect floor tiles
5. Mail fabric
6. Go to McKay's Used Books and resell books, buy more 
7. Stop at grocery store, salad, milk, borax

Yesterday we closed on the refinancing of our house, woowoo! Now we are getting 5% interest, which is more like it.
And then we went to McMinnville Lowe's to buy tile, and found their selection was minimal, so I am hoping I will have more to choose from in Chattanooga today. Gotta get that floor laid, as there is suddenly NO STUDIO until that is done.

I have been an inattentive knitter lately and only really knit at Knitting Group. So the same sock and the same one day scarf have taken a month to finish.

It dawned on me yesterday that my new floor will allow indoor dyeing. O the possibilities..
And painting with drippy paints.
And moving things on wheels ( everything but the couch is on wheels) easily, making space available when I need it.
I must find that tile!

Tuesday, June 22, 2010

Indoor Project

 We are having a mini heat wave this week and not wanting to see anyone drop from heat prostration, I proposed an indoor project. Let's rip up the stinkin' ugly carpet in my studio. Doesn't that sound like fun?
I got up early, in my excitement, and began stowing away my fabric from these shelves and my work table. It all got put into Rubbermaids (from which it came, only months ago)


Here is the offending carpet. Looks pretty innocent here, but I know better. When one works with fabric, yarn and paint, one wants an easily cleaned surface and this is not it.
 It was already stained when we moved in, which meant I should feel OK about dropping paint brushes or potting soil or dye on it...but I didn't.
Mostly I don't like the fact that it has to  be regularly vacuumed and that's the rub. CAT HAIR and THREADS and lately FLEAS.
This floor needs to be tile like my old studio. Washable and not stinky.
And then I can dye INDOORS, all year round, and paint and wipe up the drips and quilt and sweep up the scraps and threads and knit and pick up the yarn without picking up anything else along the way.

So now I have to find that perfect tile to put over the concrete.
While this was happening in the studio, Dave was vacuuming up the remaining bits of carpet debris and our vacuum died. Hurray!!! I was not a fan. It was loud and miserable to empty. So we had to get a new one...
And here it is. Vroom, vroom.
Next, the carpet in my bedroom has to go. There will be no carpet in this house and we will all breathe easier, except the fleas.

Sunday, June 20, 2010

Boxed Stripes #2

Boxed Stripes #2
 31" square, hand dyed cottons, fused, machine quilted $350 Email me

Since I took the process pledge, I will show some process pictures. This is the quilt sandwich with the top fused to the batting and the backing pressed nice and smooth. There is no fusible on the backing fabric.
I put a few pins in place for the initial passes of quilting, and then out they come as the piece is quilted. I stop every now and then to press the whole quilt and make sure no puckers or pleats are happening.


Choosing the thread color: should I go with the lavender or the green? I chose the lavender because...um...just because.


 I am still in love with channel quilting and especially on a quilt like this one where none of the blocks are truly square. The channels aren't straight either, so there!

After a quilt is finished there are invariably leftovers. The nice thing about fused leftovers is that they are quite ready for something else.


This is the trash.
And this is what gets saved.

And then #1 and #2 together.

Friday, June 18, 2010

Process Pledge: Fused Piecing

Fused applique was where it all began for me, but after a time I wanted to make some quilts that looked like they were pieced.
I thought: Can I fuse them? And the answer was: Why not?
Here's how it is done.
Beginning with already fused fabrics, cut some strips. Keep the fused side down. Choose two contrasting colors, one light and one darker.


 Cut a square-ish piece from one of the strips and from the other cut some very narrow strips.


Apply the narrow strips to the square and fuse lightly in place. In this case I am fusing directly onto a teflon pressing sheet. You may also fuse onto the release paper leftover from the Wonder-Under (no fusible remains on the paper). After the piece has been fused, it peels up easily. It can be pressed many times onto this pressing sheet without losing its ability to stick.

Next cut a strip from the contrasting fabric. Trim it to the size of the block, either before or after pressing it with the iron. Overlap the edge of the square with the fabric strip, just a bit, not a complete 1/4".
Continue to add and trim the strip until the center block is surrounded. The order in which the strip is added is your choice.

This is the reverse side of the fabric, which shows the uneven amount of fusible on the darker piece. I didn't even notice that when I started. It still works since the lighter fabric has been fused to the darker piece. It still works, since the lighter piece was completely covered with fusible. Should there be a need to add more fusible where there is none, just cut a piece of Wonder-Under the size needed, placing it on the bare spot and then.....cover the whole area to be fused with a protective sheet of release paper, so no fusible from the remaining areas gets on the iron.
 All four sides are now attached. Trim the excess strip and this part is finished. Notice the skinny 'seam allowance' visible on the lighter strip. No need to worry, it will stay fused.

The next border is done in a similar fashion with thin strips being added before applying the next round.
And here is the finished block.
Neat and quickly done, with no trips to the sewing machine. I likey!

Some have asked about fraying. Since the fabric is cut and fused  (no paper remaining on the back, ever!!)and carefully handled  (mostly)  fraying just does not pose a problem. However, and this is a big HOWEVER...I am using hand dyed cottons here which are different than commercial cottons (solids or prints) in several ways.
1. No surface coating of any kind, like Perma-Press, Wash and Wear, or Easy Care. These do not wash out and do prevent perfect fusing.
2. With commercial cottons, the printing is on one side and the back is not the same, so when it is cut, the edges sometimes are not nice.
3. Commercial cottons are often a looser weave than the fabric I use/dye. The looser weaves are more likely to fray sometime down the road.
4. It is possible to fuse commercial cottons and use them in quilts, as long as some care is taken to cover the edges with fabrics that don't fray, like closely woven hand dyes.

Finally, I am making quilts for the wall, not functional quilts for the bed, lap or crib. It's a whole different ball game.
PS. To make the rest of the quilt, make more blocks, overlapping as if to seam until the top is fully assembled. Do NOT fuse this to another sheet of fabric, but instead fuse it directly to a smooth surfaced cotton batting, such as Hobbs Heirloom Cotton (80/20) or Fairfield Cotton Classic. Fusible batting is not necessary, and neither is spray glue. No basting is required to quilt it either. I mean, REALLY.