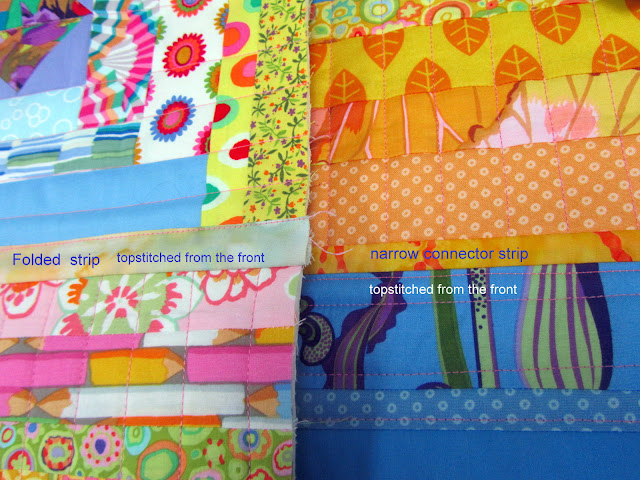
 In hopes of making these techniques clear and understandable, I have some samples to show, which I just used in my two lecture demos. The first sample is using the Narrow Connector Strip. Using two quilted sections, sew a 1" strip (1/4" seams always) to the front of one section and at the same time, sew a folded over two inch strip to the back of the same section. All of them are raw edges aligned at the outside edge of the quilted section. Doing it makes it obvious.
 This shows the back side with the folded connector strip sewn to the back. The second section is sewn to the front connector strip, with a 1/4" seam allowance.
The wider back connector strip will cover the butted seams made by the front connector strip.
 Fold the back strip over the seams, and topstitch from the back or pin carefully from the front and stitch in the ditch, catching the edge of the folded strip.
 Here the finished look. If I had used solid fabric, it would have been nicer, but the striped strip makes it more understandable.
The two choices of covering the seam: folded strip on the front or folded strip on the back. Either one works, but one is more visible on the good side while being easier to stitch. It's up to you which to do.

 This shows the doubled connector strip on the back, and the batting is cut to fit in between the seams, and then zigzagged to one edge of the seam allowance. Fold over the back strip and topstitch, either from the back or the front.
 The simplest one of all is the Flip and Sew border technique. Join a top strip and a back strip (not folded!) at the same time. Then add batting strip, and zigzag butting it up against the seam allowance. Then quilt the strips.
 Please feel free to leave any questions in the comment section.


Many thanks! Can't wait to try it. Beth F.
ReplyDeleteIs the front strip also a folded piece? I finally understand why it is narrower, but doesn't appear to be folded. Is there a reason?
ReplyDeleteI have done this method before buy always sewed the back strip by hand, what a pain. I am so ready to try this.
Perfectly clear now. The narrow connector doesn't need batting like the wider connector. Right? Thanks for the tutorial...again.
ReplyDeleteJanet in Portland,
ReplyDeleteThe narrow connector strip is sewn twice, once to one section, along with the folded connector strip, and second to the other section. Essentially, the narrow strip connects the two sections,with 1/4" seams, and then the FOLDED back strip covers the butting seams from the two sections.
There is no need for more batting with the narrow connector strip. The seams provide the fill.
This is finally getting through my tiny brain. Thank you very much. I feel a little better about not getting to see your class (I bet it was great). You're a jewel to share this with us.
ReplyDeleteTry it; you'll like it!
ReplyDeleteI think I understand. Thank you. So one connector strip is one layer of fabric and the other is always double folded? With the wider strip which creates a sashing, have you ever used two single layer strips? And maybe prepressed (is that a word) the folded edge where you will do the stitching? I guess my question is, does the wider double fold create extra bulk? Thanks again!
ReplyDeleteYou are the Goddess of QAYG!
ReplyDelete