Tuesday, March 31, 2009

Transplanting

IMG_7263-1

My bleeding hearts have already started blooming. They will continue to grow taller and fuller and bloom for about a month, through frostings and maybe even a snow shower. What a colorful combination they present. I also have a newer sister plant in white on the opposite side of the garden. We’ll see how she does in a few weeks.

I’ve been at war with the voles who are eating the roots away from my beloved heuchera and hosta and I have decided on a new strategy. Retreat and conquer.

IMG_7258

I pulled all the heuchera out of this bed and most of the hosta and transplanted them to the front garden. If you don’t give the voles any thing to eat, maybe they will pack their little bags and go elsewhere. What remains is the creeping Jenny, variegated Artemisia, and vinca vines. That looks like lovely black dirt but is not. It is mulch which has broken down and is very friable, making it super easy to lift a plant, either with a trowel or by gloved hand. Add that to the fact that most of the roots have been eaten away and it was a simple decision that if these plants were to survive they had to go to higher ground.

IMG_7259

Heuchera, aka Coral Bells are what I am collecting, along with multiple varieties of hosta, and I am crazy for all the different colors that they have hybridized. Everything here came from either the vole’s dinner table or just recently, Wal-mart’s garden center.heras1  heuga1 heulr1   heupfl2 heusco1

Just a few of the delicious varieties that I plan to plant, as soon as I find them.

IMG_7261

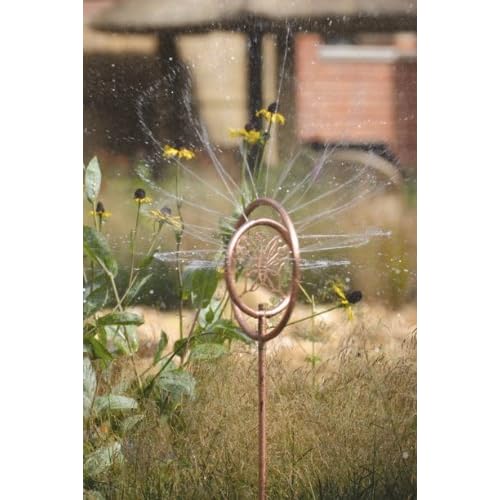
I got my new sprinklers in the mail yesterday and they work just great. Like falling rain on my transplants. Lovely.

IMG_7252 IMG_7253 IMG_7256

This little skull needs identification. Dave found it on the   hill when he was taking a nature walk. Got any clues as to what it is? Email me if you know.

Monday, March 30, 2009

A Blast of Cold Air

IMG_7235

That is a cloud hanging low on the frosted field below the hill. It’s on its way across the road up towards my garden. Frost warnings were not posted but I could tell that it was getting colder by the hour, so I checked the forecast and it looked like we were in for freezing temperatures. I have pretty much held back on early planting, with the exception of about a dozen hostas. I couldn’t help myself. Last year’s plants have sprung up and I just wanted to join in. My older peony is about 15” high with buds, so I had to cover it. But the ones I planted last year will have to shiver in the mists without cover. I hope they can take it.

IMG_7233 This empty garbage can did the trick for the big peony, and I’ll bet it won’t be the last time I’ll do it this Spring.

IMG_7234

My Jackmanii clematis is tall enough to attach itself to the strings tied to the trellis and I used anything and everything to protect it.

stock photo

I Last year I had to untangle the vine from the trellis so Dave could paint the stairs and while it did bloom nicely, it always looked like a glob that had been undone. This year I planned to train it up neatly and hope for a showy array of blooms. Gardening is all about hope.

IMG_7229

I am afraid I didn’t have enough covers for the new hosta and they definitely got bit. However, I just bought four new ones for $2 each, because I am a hosta nut, so if these don’t make it, I will replace them. One cannot get emotionally attached to plants, she said.

IMG_7224-1

Speaking of emotionally attached…I am MAKING you look at my sprouting Baptisia. Can you barely tell these are nubbins of green? I got on my sore knees to take this picture. I am so excited!  They look like nothing exciting at this point but I am looking forward to this mass of purple and green in my future. I have found two returning clusters (so far) and it thrills me so much I had to share.

I have gone over the edge.

Sunday, March 29, 2009

I was WRONG

  Last April I posted these pictures and said that they were frog eggs and that this second picture was probably frog eggs of a different variety. I don’t why I imagined that to be the case, but I WAS WRONG. Now I know they were fish eggs! I had no idea that we had any fish in the pond at that time because the muddy water obscured them. Now as I look at that blob of eggs it seems perfectly clear that they were fish babies.

Duh.

So admitting I was wrong is actually making me a happy girl, because I love those little fishies and this Spring I am hoping to see more blobs like this with orange babies in them.

Admitting I was wrong led me to thinking of other times I was wrong and had a tougher time admitting it. But how glad I am that I did. Like my first marriage for example. Getting past that mistake and marrying Mr. Wonderful was such a supergreat result.

So if you can’t admit you are wrong then you can’t fix the mistake and you are stuck with the status quo. And that can lead to long and involved messes like a prolonged war, for an example.

But what I am leading to is that the new series that I have started, ROYGBIV, has begun too wimpy, and needs to be bigger and better, so I am putting my initial quilt aside, and starting again.

I feel much better now that I have that off my chest.

Saturday, March 28, 2009

What is going on in my head?

Leslie said...

I always wonder what goes on in your head when you compose. In some of your work, I tend to see small elements encased in frames that increase in size as I move away from the center of the piece. It's quite interesting. Whatever you think (or do unconsciously? as you do this, it totally works for me. :-)

While that isn’t exactly a question, I thought this might be a good opportunity to talk about what happens when I do a design like Roygbiv #1 or any of the non-pictorial stuff I make.

carioca-1 IMG_0861

Sometimes I am motivated by the shape of the piece first. The one on the left is Carioca, and I was doing a series of pieces 9x21” in a vertical format. I found fabric I liked and began collecting color scraps that looked good together. Carioca is a stack quilt which means that it begins with smaller pieces for the top layers and then more layers are slipped underneath until the format is completely filled in. As I add layers I am cutting away the overlapping fabrics to eliminate bulk. Finally I add details in lines or dots or tiny squares. It’s a look-and-feel thing, but the primary motivator is just playing with color. I look for contrast and texture, and value and balance. You know, all the stuff that makes a good design. But honestly, the brain is on autopilot during the process. And it doesn’t always work.

On the piece on the right, Bon Bon #1, I recall being inspired by this piece

It was not the fabric or the colors but the layout that interested me. Then I made a lot of fused patchwork to use in the piece, before I determined the arrangement and finished size and shape.

Of course the finished work didn’t turn out to be exactly like the inspiration piece, but layout was first in my mind. At the time I made Bon Bon #1 a new design concept had infiltrated my brain…organizing a composition by color. In other words, finding similar colors to group as the main theme and adding a contrast group of colors for accents. In Bon Bon #1 my colors were reds/pinks with green accents.

Organizing and design are similar occupations. One places things together in an orderly fashion so that they look right. When you rearrange the shoes in your closet you are doing the same thing.

So when I start playing with my fabrics, I get to arrange things inside a format, like a square for instance.

With Roygbiv #1IMG_7213-1 I started with a leftover piece of batting cut to size. I have scraps of fused fabrics at my disposal that are also leftovers from other projects, often fused to each other like patchwork. I cut, assemble, remove and discard until it starts looking like something. Then I look at the design and see what it needs and add it, usually dots or thin strips. Knowing the finished size first helps focus the design.

So much of this designing stuff happens because I allow myself to just play. It is fun most of the time and awfully hard work other times. The more I do the easier it becomes.

Friday, March 27, 2009

After the Rains

We are living in waterfall-land. Since the earth here is mostly rock and clay, when it rains it all has to go somewhere. Gravity being what it is, that is downhill. It has been raining heavily for days and that makes more waterfalls, even little ones appear everywhere, especially along the road down the mountain. This is the one we see most often as a steady trickle, but it was unbelievably huge yesterday. There is a pull off spot, so we don’t stop mid-road to view this beauty.

I forgot to post the finished quilt that I showed in progress yesterday. I am doing a series called ROYGBIV after the colors in the rainbow. This is #1.

IMG_7213-1

ROYGBIV Series #1

Hand dyed cottons, fused, hand and machine quilted

11.5x10.5” $250

Thursday, March 26, 2009

Quilting a Small Work

IMG_7207Sometimes when I make a small piece I like to hand quilt it before I add the backing fabric to make the quilt sandwich.

That way the knots from the embroidery floss or perle cotton threads are not visible on the back. The top is fused directly onto the batting, no base fabric is needed.IMG_7206

This is what a fused top looks like before it is backed with batting. Notice the filmy surface? That is the Wonder-Under fusible. This top was assembled on a teflon sheet (see sidebar) which makes it easy to make fused seams. Overlapping fabrics are trimmed away to prevent bulk. Of course my fabrics were all fused before I began, and the paper backing removed before cutting and assembly.

IMG_7192 Once the hand work is finished I am ready to use the Escape Hatch Finish to enclose my quilt top. This picture shows the strip of fusible on the back of the quilt, fused to the wrong side of the backing fabric. I cut through it BEFORE I sewed all four sides of the piece. Then I will trim the four corners and turn the quilt to the right side through this slit in the backing.

IMG_7196

I am not done yet! Now I can machine stitch in the ditch. This makes it look like I have machine pieced the quilt.

IMG_7199 IMG_7201-1

Then I use a self-threading needle to bury the thread ends.

IMG_7204

Then when all the quilting is done, I machine stitch my signature.

Wednesday, March 25, 2009

Fusing Questions and Answers

Bradford-Copse1-1[1]_edited-2 I can always tell when PBS has aired our Art of Quilting program because my mailbox fills up with pertinent questions.

One can fuse fabric onto a base fabric, as in fused appliqué or just fuse two pieces together by overlapping the edges. In order to make a 'seam' in this way, one must have a pressing base of the release paper from the Wonder-Under, or a teflon pressing sheet. When neither is available, we have also used parchment paper with good results.

Fuse the fabric using a hot iron and a swift continuous movement, paying extra attention to the edges of the paper, making sure to fuse them. LET THE FABRIC COOL BEFORE ATTEMPTING TO REMOVE THE RELEASE PAPER. Once cool, remove the paper and cut the fabric with a scissor or rotary cutter. Because the paper is already removed, the edges are not stressed and will not fray.IMG_5838-1 This is especially true if you are using a tightly woven fabric. Looser weaves might fray if handled a lot.

Essentially, one fused piece of fabric must touch the surface of the next piece of fused fabric. Press lightly with a hot iron and let cool. Then peel both pieces off the fusing surface and voila, a fused seam!

That's it. That's all there is to fused seaming, or fused appliqué.

WE in the CSOF (Chicago School of Fusing) use only hand dyed fabrics in our work because these fabrics stay fused best, and the raw edges show only the color of the fabric, not any printing associated with commercially printed fabrics. With prints, only the surface has the color, and there is a wrong side, so while one can fuse them, one must deal with the unattractive edges. Secondly hand dyed fabric inherently has no factory applied coatings which interfere with permanent fusing.

bon4done-1 Any design that can be imagined can be accomplished using these construction techniques. We use fusing for quilts for the wall, of course, and do not recommend fusing bed quilts that will be washed unless all edges are finished and secured by quilting.

There was a question about the aging of fused fabrics: Here's the skinny on longevity of fusing. I have OLD fused art quilts, which are doing just fine. And should something release from the surface, momentarily, a hot iron will remedy the situation. Discoloration? Not a bit.

On the other hand, the functional quilts I made in the beginning of my quilting odyssey, which have been used and loved, and were hand and machine pieced and quilted, have shown some age, some splitting of seams and some wear. Nothing is permanent and if artwork is handled with common sense, it will last and last.

Of course we could all use polyester and never have a fear of anything deteriorating.

=========================================================

Yesterday I mentioned that I would be shopping online for  a fancy arty sprinkler but what I found did not seem durable enough for more than one season. Dave found the perfect thing to replicate rain, on Ebay. Two for $30 and free shipping. Here’s the link.

Woowoo!

2d0a_12 4267_12

It rained all night and now I have a day off in the studio. Double woowoo!

Tuesday, March 24, 2009

The Beds are READY

IMG_7181 Dave got right to it, first thing in the morning, which for us is as soon as it is light. He decided and I agreed that the proper spot for the new beds was adjacent to the big bed and back about two feet.

IMG_7180

Then they only project into the yard six feet instead of eight. The space between is a large 16 feet, perfect for a future patio…someday, not this year.

These are lasagna beds. NO digging required. The bottom first layer is cardboard, topped with an entire bale of straw, shredded and spread of course, and then 500 lbs of topsoil and another 500 lbs of composted humus and manure. All the seed packets say that the plants perform best in full sun and well drained soil. With this layering they will get fabulous drainage. That little kneeler behind this box is my best friend when planting. I am officially an old lady. Or at least my knees are.

IMG_7182

Couldn’t resist a few packets of fresh seed. I am determined to get a crop of green beans this year. I tried last year, but the spot I chose didn’t get enough of anything they needed. Only four seeds sprouted and nothing came of them. With this bed of yummy soil I have more confidence. Same with the zucchini, usually an easy plant to grow, but not in the soil we have. They take up a lot of room, so I will be conservative and not plant the entire packet of seeds. And what about root crops like beets and carrots? I had success with the beets last year and since I found these stubby carrot seeds I am going to give the Chantenay variety a try. Basil. Must have basil. If you don’t buy the seeds early, they run out.

My garden needs Sun, Soil and WATER. Actually I should say WATER , sun and soil.

I am going to shop online for a fancy-arty sprinkler that I can switch on first thing in the morning and run for an hour. This is where having our own well is really great.

I am not going garden-nuts this year. I promise. I walked right past the tomato and cabbage seedlings. I’ll be waiting another month before the tomatoes, cucumber and pepper plants show up in the beds. In the meantime we expect several days of rain, and I can get back to the studio.

Monday, March 23, 2009

Starting the Garden

Well it would be nice if this were my space and I had the help Michelle Obama surely must have, but I guess I am happy to not have bitten off more than I can chew. Chew, veggies…get it?

IMG_7158  IMG_7160 You already know how much we like to rearrange furniture, and so it is with these two garden bed frames.

IMG_7169 Should we push them up against the existing bed and have a green space in between or put them parallel to the long bed and have a mulched walkway in between?IMG_7166

Whichever way we put them it looks good to me. But then I am so excited to have these new beds that I can barely wait til the last frost date.

IMG_7164 The assembly (by Dave the Fabulous Husband) was a snap and we wonder why we ever did anything else for our previous beds. Cut 16’ pine boards from Lowe’s into 4’ and 8’ lengths, paint with polyurethane, drill holes, insert lag bolts, fill with soil. Done-a-roo!

I know I will be sharing this garden with the local wildlife

IMG_7167 IMG_7168 The front and back doors of someone who will love my garden as much as me.

IMG_7171 And more to come I am sure.  eeeooowww.

This is a Brown Recluse Spider. I so don’t want them