Wednesday, March 31, 2010

Gardening on the Dark Side

One of the good things about having a blog is keeping track of bright ideas that didn't pan out. Ah but hope springs eternal here at the Mexican Chalet.
This is our hill, in April '09, aka the Dam which is adjacent to the pond. It is in shade most of the day. Last year I planted liriope which is supposed to grow anywhere and 18 Pampas Grass plants. I totally forgot about planting those. As far as I know, not one Pampas Grass survived more than a few weeks. The liriope is more or less still there, but not what I would call thriving.
Sewcatherine wrote:
I spent the last 6 years pulling english ivy out of my woods that the previous owners let wander later in life. Please reconsider planting the ivy if it is not in a strictly contained area. Your woods are so beautiful. Anyway, hate to sound negative b/c I love your blog and all that you do but I have a personal vendetta against ivy!!


I feel your pain Sewcatherine, but I planted a few English Ivy plugs last year and they THRIVED. I need more thriving, and so I am going to try English Ivy here on the damn Dam.
I am hoping this time my efforts will be rewarded and erosion, weeds, and voles will be thwarted.

Heuchera, tiarella, hosta, peonies and lilies, all planted last year or in '08. I cleaned up this bed yesterday and found most of the perennials had made it, despite being completely overrun by self seeding impatiens, nasturtiums and weeds. I vow to keep a eye on volunteers this year, but I have to say I am pretty darn happy that so many of these have triumphed and flourished. This bed is 90% mushroom compost and mostly shady, except for morning sun. Not in this picture is a really happy Knockout rose. It is already 3 feet tall and has leaves. So in my book, that is a big success.
  The other front garden, which is now double this size is showing promise, but I foolishly planted echinacea, phlox, and coreopsis here and the weak amount of sun caused them all to get leggy and messy. Out they come and will be moved into containers in a sunnier location. So much of gardening is transplanting poor decisions. We live and learn. I have to say that the peonies in both beds are looking really enthusiastic and may actually bloom...if I am lucky.


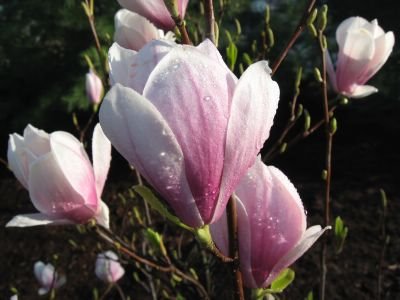
 On the not so lucky side is the demise of 75% of the euonymus that Dave planted along the edge of the shade garden. The voles ate their roots right off. Since this picture was taken last Spring, we have a big pink Magnolia planted at the entrance.


We are hoping to see blooms like this (from our house in Cary IL 2006).


Monday, March 29, 2010

Flip and Sew Coverlet


Our summers here are a bit too warm to sleep under a quilt, but I want a patchwork coverlet and thought it could work as just two layers of fabric with no batting in between. So let's pretend that these squares of my ugliest fabrics are quilt blocks like log cabins, or nine patches or whatever you like. While we are pretending, think of these first three squares as representing row one of a full size quilt top and the second set is row two. Cut two pieces of lining fabric the same size as each of these rows.
Putting right sides together, line up the seams, and place both lining fabrics underneath the two sets of blocks. Sew the seam through all four layers.


Open and press. It looks like a good start. The back is neat too, with the seams enclosed.


Row three is done similarly. Right sides together with the lining underneath. Sew seam and flip open.

This is the back side and the lining will be folded open and lined up with top edge of the third row of blocks.
Press open and continue in this manner adding strips of blocks lengthening the whole top.
Or one could add rows on either side of this set and make this the center of the coverlet.
Or thirdly one could add rows concentrically, round and round until the finished size is achieved.
Going back to the beginning rows, one could stitch in the ditch between each block, after each row is added,  to keep the lining in place.
A binding would be the finishing touch.
+++++
I am in garden mode now. I spent Monday shopping for ground covers, like English Ivy (96 plugs), 64 Liriope and 32 Pardon Me Daylilies. They are red with lime green throats (inside the flowers)
 woowoo!

Sunday, March 28, 2010

Butternut 

Butternut
Hand dyed cottons, machine pieced and machine quilted. 21.75 x 22.5" $250 Email Me

Since I began piecing again, I have collected lots of scraps and parts of patches that either didn't fit or were trimmed from other compositions. While organizing them into similar colors I found there were enough of these warm tones to make a whole new piece. Starting with the tiniest chunks first and building from the center outward I began to sew all the parts together. Some of the pieces had little bits of contrasting colors still attached and I enjoy seeing them sneak into the work.
  This was so much fun and for a minute I considered instituting a Scrap Using Saturday, where the remains of the week's work would be gathered into one final piece. But that implies some consistency of producing a lot of work weekly and that felt like PRESSURE. Eeeooow. So if I make some stuff and if there are interesting leftovers then maybe I will try to make them into a final work...Or not.

Friday, March 26, 2010

Binding Tutorial


1. Cut binding fabric at 2.25" wide, fold in half and press the length of the binding. 2. Stitch on the front of the quilt sandwich with a 1/4" seam. 3. At the corners make a 90 degree 1/4" from the end of the side. 4. Sew off.


5. Fold up the binding at a 45 degree angle. 6. Fold binding again, even with the quilt edge. 7. Stitch down folded end and continue stitching on that side of the quilt.


8. Sew mitered corners on all four corners of the the quilt until reaching the start/end point. 9. Trim excess binding to 1/4" to allow for the seam. 10. Unpick previous stitching to allow binding to be sewn opened up. Sew seam. 11. This shows the finished seam, which has also been sewn to the quilt top. 12. Press over and  fold the binding, forming a nice folded miter and pin the binding evenly all around the edge, catching the backing part with the needle.  


13. Pin so that the pins can be removed.14. This shows the back side miter before stitching. Make sure that is nicely folded too. 15. Stitch in the ditch from the front. 16. Neat close to the edge binding, front side.

17. And the backside showing the miter is caught with the stitching.

Posted by Picasa
Fixing the Lighting


Lately I have become more and more dissatisfied with the photos of my work.When I click to enlarge them on the screen I see blurry indistinct detail. I have been taking pictures of larger works and the dinkin' around necessary to get them to look proper on screen is tiresome and mostly ineffective. I believe bad lighting is the problem.
Today I bit the bullet and had Dave, who has much longer arms, install ceiling hooks for a shop light, equipped with color corrected bulbs. The second set of lights shine upwards which makes for a more balanced shot. It looks very shadowy in this picture, but nonetheless it is MUCH better for shooting pictures. I won't be using the light below on the table, except for photography.
I have had the most trouble getting the color right on Sorbet and now with the new light setup it looks much better on the screen.
And then, duh, I noticed I had my camera set a much lower resolution than I used to use. I don't know when or how that got changed, but I returned it to the higher resolution setting and now everything is how I like it.


And today the fabric Brooke and I ordered from Fabric.com arrived. They were having a sale that we couldn't pass up. 16 yards of batik for $40. I kid you not. (free shipping and a 15% off coupon). Half goes to Brooke and I will combine my half  with hand dyed fabric and feel like a Mrs. Gottrocks. La dee dah.
++++
In the comments Donna wrote:
Melody: I love, love, love the quilts you have been cranking out & I so appreciate any tips you give. I am with Brenda & I don't quite understand the binding part, especially when you said, "I apply binding by cutting straight of grain strips at 2.25" and doubling the fabric...." Doubling what fabric??? Thanks again for an amazing blog.


The answer in pictures below.
Piecing Tutorial....Me?


I see Jane's comment. I do Jane's bidding.
But really, most of the time I don't know what I am doing when I am making these quilts. I may have an idea, like a block I want to try, and just begin there. I am showing closeup details of my recent quilts (see Recent Quilts Page above for full shots) so you can see that parts are parts.
To make this stripey block, cut a square and then some surrounding strips and cut and sew until that small square is surrounded by another color. To make the stripey border, take a big rectangle of fabric and cut it into strips and insert contrasting strips. Sew and cut  across to make striped strips. There will be leftovers. There will be blocks that look icky.

To make slanting strips like these, put two pieces of fabric together, one on top of the other, cut through both, separate and sew, or just make a pile and sew them together with others in the pile. Change direction every now and then.

To do the prairie points..cut a square, fold in half diagonally to make a triangle , and then bring each edge together again for a smaller triangle. When I made this quilt, the prairie points were an afterthought, so I opened up some seams and inserted the points into the space and resewed.

Some of these diamonds are composed of half square-ish triangles and others are just big pieces with triangles sewn on in a flip and sew fashion. To fit them together is the trick. It helps to sew matching fabrics to each un-fitting-together section. Then overlap the consistent fabric, cut through both, remove extra stuff and sew together. The quilting disguises the seams.

The tutorial for the Disappearing Nine Patch is here. It is a really nice tutorial, with steps and everything. Not like my  version.

Thursday, March 25, 2010

Connected Nine Patch


Connected Nine Patch
Hand dyed cottons, fused, machine quilted. 28.75 x 21" $250 Email Me


A couple of days (week?) ago a reader suggested that I should make a disappearing nine patch quilt. I didn't know what that was and had to find one. I did come across a blog that had a tutorial, but I didn't get that must make it feeling. So looking at this design, I am thinking the nine patches could qualify as disappearing to some extent, especially if you don't know what they are supposed to be.

Don't think I haven't noticed the predominance of primaries in my work this month. When the fabric is out, and gets put away, it still is on the top of the pile when starting up again. I'll have to find a way to put it away under the stack. 
Three Big Blocks

Three Big Blocks 
Hand dyed cottons, machine pieced and machine quilted in a grid pattern. 53.5x24.5" $450 Email Me
These blocks were made with off centered squares so they could be divided by the crossing strips. Then I thought they needed a few more rounds to vary the coloring at the edges. This is how quilts sometime get bigger than originally planned. I got to use lots of deeper colors, some were overdyed with black.


 To make the grid pattern I used a bar that slides through the back of my presser foot and can be adjusted to make stitching spaced evenly...more or less.                                                        I apply binding by cutting straight of grain strips at 2.25" and doubling the fabric, stitching a 1/4" seam from the front, turning it over and stitching it down in the ditch.


The back of the binding is caught by the top stitching and no hand work is necessary. If you click on this picture you will see the red dots of the top thread showing on the back. This is the correct tension, which new quilters often worry over. Adjusting the tension so no bobbin thread shows on the front is sometimes necessary. And one more thing...I am not a fan of walking feet and find that a regular open toe foot works best IF THE PRESSURE IS LOWERED to zilch. Most machines have a pressure regulator to increase or decrease the amount of pressure your foot puts on the fabric. Dust off  Consult your owner's manual.