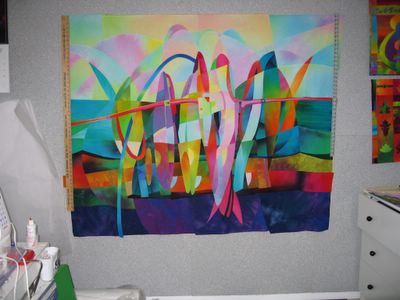
The finished quilt top is very uneven at the edges and I hung up some yardsticks to try and find a straight edge to start this process. Any straight line will do, and from there I will be able to square off the rest of the top with my quilter's rule. I use a soap sliver (see below) to mark the first line, and then I carefully roll and pin the top together ...
so I can slide it onto the floor. It is delicate at this point because the pieces are still just lightly fused together. Some open up and will have to be refused when it is all flat on the floor. I slip a pressing sheet under the area that needs refusing and iron it again.
My studio floor is black and white 12" tiles, and after a careful sweep I am confident about laying the top on the floor and taping it down for the big squaring off. I have pictured the Quilter's Rule and my hand sliver of soap marking tool. Both totally necessary items for this process.
The batting is spread out and pressed and steamed and pressed again, trying to remove those puffy areas, and semi-permanent creases. This is Hobbs Heirloom Bleached Cotton, 80/20 which is a recent bargain purchase. I usually use natural colored Hobbs, but this quilt has some light fabrics which may benefit from the whiteness. Or not.
Once all four edges are marked for the squaring off, I gently place the top on the flattened batting. I haven't cut it square on the floor, as my knees can only stand kneeling so long. I can cut it on the table more easily and can just tug at the batting to aline the next area to be cut. At this point it is only placed on the batting, and after it is trimmed, I will then cover it with a press sheet and steam and press with a hot hot iron until I feel the thing is entirely fused to the batting .
Then I will trim the excess batting away.


It looks gorgeous and so big!!! Hey, I want some of those magic scissors. Amazing!!
ReplyDeleteThank you for the tutorial! You are so kind to share your knowledge with those of us less skilled. I love your cruciform series and can't wait to see this one quilted. I'm still anxiously awaiting sign ups for the Fishers, IN workshop you will be hosting. I'll be there!
ReplyDeleteWow - this is so much easier than the method I've been using. I may become a convert to fusing!
ReplyDeleteMel...does this one have a title yet??? I can totally see loaves and fish....ya know sermon on the mount stuff.....sorta stays along the cruciform theme....don'tcha think???
ReplyDeleteLove Ya
Annette Hendricks
Melody, I keep coming back to look at #4. It's just beautiful.
ReplyDeleteMelody, this quilt's got it goin' on! I'm amazed by the sense of 3-D depth--across cyberspace no less. And the design is flawless. Do you offer group scissor training? Can they be taught to stay where I leave them?
ReplyDeleteMel, I love your work and I can't get over the way your crank out quilts.
ReplyDeleteHi Melody, I'm nearly speechless(I said nearly)with your ability to create these beauties. I like the different colors in this one, however, I'm still reeling from Big Green and all its fabulousness. I'm slinking back to the drawing board. Congrats and thanks for the close-ups and how-to. P.S. Dave's Blog really rocks. Dee
ReplyDeleteWhen I look at this I see large dolphins standing and waving and I can almost see the joy on their faces as they stand proudly and accept the adulation of their audience - all this first thing in the morning and I haven't even had any breakfast yet.
ReplyDeleteKat
Oamaru NZ
Well...I didn't see it until Kat mentioned it but......"Goodbye, And Thanks for All the Fish!" I'm never going to be able to see this piece again without this popping into my head.....I am SO in love with this.
ReplyDeleteteri
Wonderful and complex. I could look at it every day. Jen
ReplyDeleteGosh, Melody, I had no idea this piece was so big. It looks fabulous in its finished form (PS I wasn't being rude when I said it looked like an alien with surfboards!)
ReplyDeleteShirley in NZ
Melody:
ReplyDeleteThis piece makes me salivate. Ilove it.
Diana in Calif.